There’s something magical about bringing your favorite video game characters to life with LEGO bricks, and when it comes to Plants vs. Zombies, the possibilities are absolutely endless. Among all the incredible plants and quirky characters in the PvZ universe, two stand out as fan favorites that practically demand the LEGO treatment: the ferocious Chomper with its snapping jaws and the wonderfully eccentric Crazy Dave with his signature pot on his head. These two icons represent everything we love about Plants vs. Zombies—the strategic gameplay, the quirky humor, and the unforgettable character designs that have captured hearts for over fifteen years.
Building a Plants vs. Zombies diorama featuring Chompers and Crazy Dave offers builders an exciting challenge that combines technical construction skills with creative problem-solving. The Chomper’s organic, plant-like structure requires innovative building techniques to capture its venus flytrap appearance, while Crazy Dave’s human form needs careful attention to minifigure customization and accessory creation. Together, they make for a display piece that tells a story, captures the essence of the game, and showcases what makes LEGO building such a rewarding hobby. Whether you’re an experienced builder looking for your next project or a Plants vs. Zombies fan curious about entering the world of LEGO MOCs (My Own Creations), this guide will walk you through everything you need to know about creating your own brick-built PvZ masterpiece.
Understanding the Chomper: LEGO’s Perfect Plant Challenge
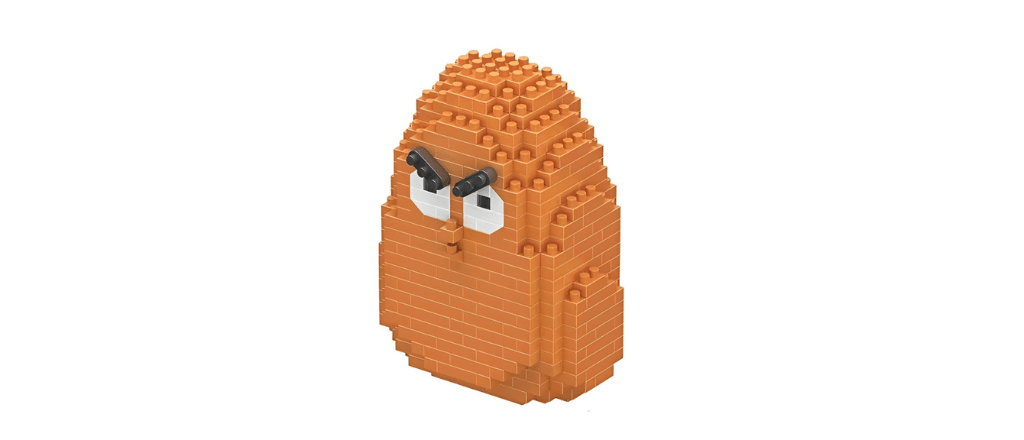
The Chomper stands as one of the most iconic and beloved plants in the entire Plants vs. Zombies roster, and for good reason. This carnivorous defender doesn’t just slow down zombies or pelt them from a distance—it completely devours them in one massive bite before needing time to digest its meal. The gameplay mechanic is instantly satisfying, the visual design is memorable and slightly menacing, and the personality conveyed through its animations makes it feel like a living character rather than just a game piece. When translating the Chomper into LEGO form, builders face the exciting challenge of capturing all these elements: the bulbous venus flytrap head, the rich green coloring, the snapping jaw mechanism, and that perfect balance between cute and dangerous.
What makes the Chomper particularly interesting from a building perspective is its organic, curved shape that contrasts sharply with LEGO’s traditionally geometric aesthetic. Unlike buildings or vehicles that naturally align with LEGO’s brick-and-plate system, plants require creative techniques to achieve smooth, natural-looking forms. The Chomper’s rounded body, flowing leaves, and articulated mouth all demand advanced building skills and clever part usage. This challenge is precisely what makes it such a rewarding build—successfully creating a recognizable, structurally sound Chomper demonstrates real mastery of LEGO techniques.
Capturing the Chomper’s Distinctive Shape
The first consideration when building a Chomper is determining the appropriate scale and proportion. Builders must decide whether to create a minifigure-scale Chomper that matches the size of standard LEGO people, or a larger display model that prioritizes detail and visual impact over gameplay compatibility. Minifigure-scale builds typically stand around four to six bricks tall, making them suitable for integration into larger dioramas with Crazy Dave and zombie minifigures. Larger display models might reach eight to twelve inches in height, allowing for intricate details, working mechanisms, and impressive shelf presence.
The Chomper’s bulbous head requires techniques that create rounded shapes from rectangular bricks. Experienced builders often use SNOT (Studs Not On Top) techniques where bricks are turned sideways to create curved profiles and organic contours. Curved slope pieces, inverted slopes, and specialized rounded elements can be strategically placed to approximate the Chomper’s spherical body. The challenge lies in maintaining structural integrity while achieving the desired shape—the build needs to be sturdy enough to handle display and occasional repositioning without falling apart.
The color palette for a Chomper build centers around various shades of green, with darker greens typically used for the body and lighter or lime greens for highlights and inner mouth details. LEGO’s color selection includes dark green, green, lime, and olive green, each offering slightly different tones that can add depth and visual interest to the build. Some builders incorporate dark red or reddish-brown pieces inside the mouth to represent the Chomper’s carnivorous nature and create contrast with the green exterior. The strategic use of color not only makes the build more visually accurate but also helps define different sections and add dimensionality.
Engineering the Iconic Snapping Jaw
The most critical feature of any Chomper build is the articulated mouth mechanism that allows the jaws to open and close. This isn’t just an aesthetic detail—it’s essential to capturing what makes the Chomper special and different from other plants. Several approaches work well for creating this functionality, each with different complexity levels and mechanical reliability.
The simplest method uses hinge bricks or plates positioned where the upper and lower jaws meet. Standard LEGO hinges come in various sizes and configurations, from small 1×2 hinge plates to larger door hinges. By building the upper jaw as a separate assembly connected via hinges to the lower jaw and body, builders create a mouth that can open wide to “chomp” on zombie minifigures and then close for digestion. This approach is reliable, uses common LEGO pieces, and allows for smooth operation, though it can sometimes look slightly mechanical rather than organic.
More advanced builders might incorporate Technic elements like pins, axles, and lift arms to create more complex jaw mechanisms. A Technic-based approach can include features like spring-loaded jaws that snap shut when triggered, adjustable jaw angles, or even synchronized movement where opening the mouth triggers other animated elements. These builds require more planning and technical knowledge but result in impressive functionality that really brings the Chomper to life. Some builders have created mechanisms where pressing down on the Chomper’s body causes the mouth to open, mimicking the plant’s attack animation from the game.
Leaves, Stems, and Supporting Details
Beyond the iconic head, a complete Chomper build needs leaves and structural support that ground it visually and physically. The leaves emerging from the base serve both aesthetic and practical purposes—they make the build look more like a plant rather than just a floating head, and they provide stability and connection points to the display base.
LEGO’s leaf elements come in various sizes and colors, making them natural choices for Chomper builds. Larger palm leaves or plant leaves in dark green can represent the Chomper’s foliage, arranged in a radial pattern around the base of the head. Some builders prefer to construct custom leaves using plates, slopes, and wedge pieces to create more customized shapes that better match the Chomper’s design from the game. These brick-built leaves offer more control over size, angle, and positioning but require more pieces and building time.
The stem or stalk connecting the head to the ground presents another building challenge. It needs to be strong enough to support the weight of the head assembly, especially if the jaw mechanism adds mass to the upper section. Builders often use Technic beams, thick columns of bricks, or stacked round elements to create sturdy stems that can handle the structural demands. The stem can be straight for a clean, simple look, or slightly curved using angled connections to add dynamism and suggest the Chomper leaning forward ready to attack.
Crazy Dave: The Heart and Soul of Plants vs. Zombies
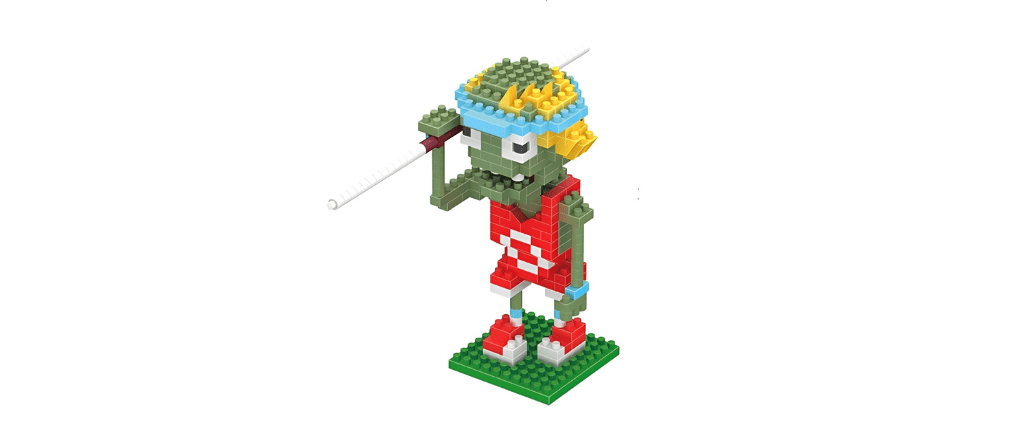
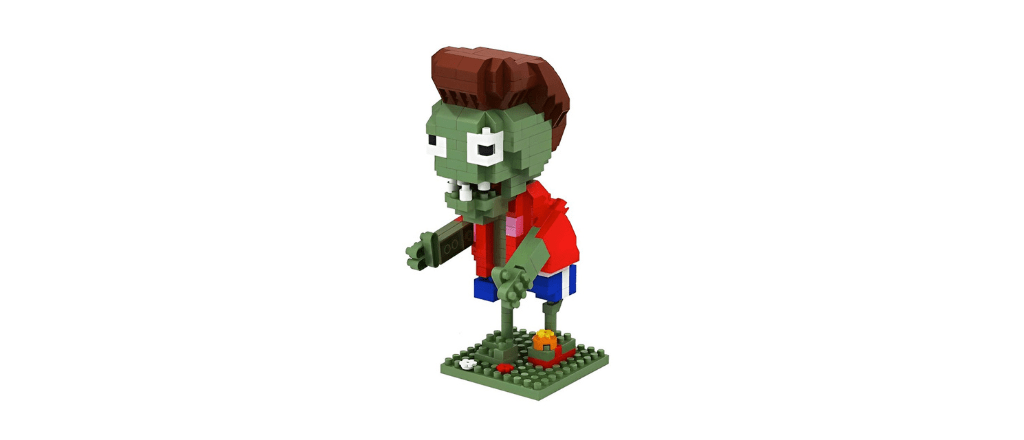
If the Chomper represents the defensive power of your garden, Crazy Dave embodies the quirky personality and humor that makes Plants vs. Zombies so special. This pot-wearing, car-driving, nonsensical-language-speaking neighbor serves as your guide, shopkeeper, and comic relief throughout the game. His distinctive appearance—particularly that cooking pot serving as a hat—makes him instantly recognizable and perfect for LEGO interpretation. Creating a Crazy Dave minifigure or brick-built character adds a human element to your diorama and provides a focal point that ties the entire scene together.
Crazy Dave’s character design combines everyday suburban dad aesthetics with absolutely bonkers elements that define his personality. He wears casual clothing suggesting a retired homeowner who’s let himself go a bit, but the pot hat immediately signals that this is someone operating on a completely different wavelength from normal folks. His enthusiastic gestures, wild expressions, and the Suburban Almanac he carries all contribute to his charm. For LEGO builders, the challenge is capturing these elements in minifigure scale while maintaining recognizability and staying true to the source material.
Building the Perfect Crazy Dave Minifigure
The foundation of any Crazy Dave build is the custom minifigure that represents this beloved character. Standard LEGO minifigures provide an excellent base, but Crazy Dave requires specific customization to truly capture his essence. The most important element—and the one that absolutely cannot be compromised—is the pot on his head. This signature accessory defines Crazy Dave visually and conceptually, so getting it right is essential.
For the pot helmet, builders have several options depending on their preferences for authenticity versus practicality. A simple approach uses a dark gray or metallic silver pot element from LEGO’s castle or cooking-themed sets. These pieces were designed to represent cooking pots and fit perfectly on minifigure heads, creating an instant Crazy Dave look with minimal effort. The downside is that these specific pieces might be difficult to source if you don’t already have them in your collection, and the exact shape might not perfectly match Crazy Dave’s pot design from the game.
Builders with access to custom printing services or waterslide decals can create custom-printed minifigure torsos and heads that exactly match Crazy Dave’s appearance. The torso might feature his casual shirt, the head could include his characteristic facial expression and beard, and even the pot could be custom-colored to match the game’s aesthetic perfectly. Services like MinifigDecals, Citizen Brick, or FireStar Toys offer custom printing options, though these come at additional cost and require planning ahead.
Clothing, Accessories, and Character Details
Beyond the pot, Crazy Dave’s clothing and accessories help complete the character. His torso should suggest casual, slightly disheveled clothing—perhaps a printed piece showing a simple shirt or sweater in earth tones. Some builders add a jacket or vest element using LEGO’s minifigure vest pieces in appropriate colors. The legs can be standard minifigure legs in brown, tan, or gray, representing casual pants that fit the suburban dad aesthetic.
Accessories add personality and storytelling opportunities to your Crazy Dave minifigure. The Suburban Almanac is essential—it’s his constant companion and the source of plant information throughout the game. This can be represented by LEGO’s book element in brown or tan, which the minifigure can hold or which can be placed nearby in the diorama. Some builders create a tiny version of Crazy Dave’s car, the Penny (though technically Penny doesn’t appear until later games), as an additional accessory element.
Facial features and hair complete the minifigure. Crazy Dave has a distinctive beard and generally enthusiastic expression in the game. If you’re not using custom printing, you’ll need to select a standard LEGO head that approximates his look. Heads with beards and friendly expressions work well, even if they’re not exact matches. The beauty of LEGO is that even approximate representations are instantly recognizable when combined with signature elements like the pot hat.
Brick-Built Crazy Dave Alternative
For builders who prefer larger-scale displays or want to showcase advanced building techniques, creating a brick-built Crazy Dave figure offers exciting possibilities. Instead of using a standard minifigure, this approach builds the entire character from LEGO bricks at a larger scale, allowing for more detail, character, and visual impact.
A brick-built Crazy Dave might stand eight to twelve inches tall, with the body constructed using various building techniques to create human proportions and character. The head becomes a major building challenge—creating a recognizable human face from LEGO bricks requires skill and creativity. Builders might use slope pieces for facial contours, printed tiles for eyes, and carefully chosen colors to suggest skin tones, hair, and the beard. The pot on his head can be built to proper scale using curved slopes, dish pieces, and creative stacking to achieve the characteristic pot shape.
The body and limbs of a brick-built figure require articulation considerations if you want the figure to be poseable. Technic joints, click hinges, and ball joints can be incorporated at shoulders, elbows, hips, and knees to allow positioning and gesture. This adds complexity to the build but results in a figure that can be posed holding the Suburban Almanac, gesturing excitedly, or pointing toward the zombie horde. Static builds are simpler but might feel less dynamic in the final diorama.
Clothing and accessories at this larger scale offer opportunities for detailed textile representation. The shirt or jacket can show folds, buttons, and pockets built from appropriately colored plates and tiles. Pants might include seams and pockets constructed with detail pieces. The Suburban Almanac can be built with actual page details visible, perhaps showing simplified plant illustrations using colored tiles. At this scale, every element of Crazy Dave’s character can be expressed with clarity and creativity.
Creating Your Plants vs. Zombies Diorama Base
With your Chomper and Crazy Dave builds designed, the next step is creating the diorama base that brings everything together into a cohesive scene. The base serves multiple functions: it provides structural support for your builds, establishes the setting and context, tells a story through environmental details, and creates visual unity that makes the separate elements feel like parts of one world. A well-designed base transforms individual models into a complete scene that captures the essence of Plants vs. Zombies.
The classic Plants vs. Zombies setting is the suburban backyard lawn where homeowners desperately defend against zombie invasions. This setting translates beautifully to LEGO, offering opportunities to build grass, pathways, garden elements, and architectural details that establish location and atmosphere. The size of your base depends on how many elements you want to include and how much display space you have available, but a typical diorama might measure anywhere from twelve inches square for a compact vignette to over twenty-four inches for an elaborate multi-scene display.
Lawn and Garden Construction Techniques
The foundation of your diorama is the grass and lawn area where the action takes place. LEGO offers several approaches for representing grass, each with different visual effects and piece requirements. The most straightforward method uses green baseplates as the foundation, providing a solid building surface in the appropriate color. Standard green baseplates work well, though their bright green color might not perfectly match the game’s lawn aesthetic.
For more visual interest and texture, many builders create grass using green plates and tiles in multiple shades. By mixing bright green, dark green, and lime green pieces in irregular patterns, you can create a lawn that looks more natural and organic than a solid color baseplate. Small 1×1 plates scattered across larger green plates create texture suggesting individual grass blades or variations in the lawn. Some builders even use green cheese slope pieces or small plant elements to add three-dimensional texture to flat grass areas.
The grid pattern from the game can be subtly suggested in your diorama through strategic use of different colors or slight elevation changes. While you don’t want to make the grid overly obvious (unless you’re specifically going for a game-board aesthetic), using slightly different green tones or thin lines of tan or brown pieces can divide the lawn into sections that recall the game’s planting grid. This helps viewers familiar with the game understand the strategic layout while maintaining a naturalistic appearance.
Pathways, Borders, and Structural Elements
Plants vs. Zombies features pathways where zombies shamble toward the house, and these walkways add visual interest to your diorama while serving practical storytelling purposes. Paths can be constructed using tan, gray, or brown pieces to represent stone, concrete, or dirt. Flat tiles create smooth pathway surfaces, while textured pieces like modified plates with grilles suggest cobblestones or rough surfaces.
Garden borders and edging help define spaces and add detail to the scene. Small fences built from brown pieces can separate the lawn from other areas, while flower beds using colorful pieces add pops of color and suggest a well-maintained garden before the zombie invasion. Builders might include decorative elements like bird baths, garden gnomes, or small trees that establish the suburban setting and create visual points of interest beyond the main Chomper and Crazy Dave builds.
If your diorama includes a representation of the house that’s being defended, even a small section of building facade adds context and completeness. This might be just a corner of the house showing siding, a window, and part of the roof, or it could be a more complete structure if space allows. The house doesn’t need to be fully detailed or hollow inside—just enough to establish that there’s architecture being protected from the zombie horde.
Integrating Chompers and Crazy Dave into the Scene
With your base constructed and your main builds completed, it’s time to integrate everything into a cohesive diorama. This is where individual models become a story, where technical building gives way to artistic composition, and where your Plants vs. Zombies vision truly comes to life. Thoughtful placement, supporting elements, and attention to narrative flow transform a collection of LEGO builds into a scene that captures the spirit of the game.
The relationship between Crazy Dave and the Chomper in your diorama tells a story. Is Crazy Dave just planting the Chomper, explaining its capabilities, or watching proudly as it defends the lawn? The positioning and orientation of these elements convey narrative without words. Crazy Dave positioned behind the Chomper with his hand extended suggests he’s just placed this defender. Dave standing to the side with the Almanac open suggests he’s explaining Chomper strategy. These subtle storytelling choices make your diorama more engaging and memorable.
Composition and Visual Flow
Compositional principles from art and photography apply equally to LEGO dioramas. The rule of thirds suggests placing focal points at intersections of imaginary lines dividing the scene into thirds both horizontally and vertically, rather than centered. This creates more dynamic, visually interesting compositions. Your Chomper might occupy one of these power points, with Crazy Dave at another, creating balance and movement across the scene.
Consider sight lines and viewing angles when arranging your diorama. Most displays will be viewed primarily from one direction (the front), so arrange elements to look best from that angle while still maintaining interest from other perspectives. Layering elements at different distances from the viewer creates depth—perhaps smaller plants or garden details in the foreground, your main Chomper and Dave in the middle ground, and house elements or additional defenders in the background.
Height variation adds visual interest and prevents the diorama from feeling flat. While the lawn itself is level, incorporating elements at different heights—a tall Chomper, Crazy Dave at minifigure height, smaller plants at ground level, perhaps a zombie approaching in the background—creates a three-dimensional composition that draws the eye through the scene rather than across a single plane.
Adding Supporting Cast and Context
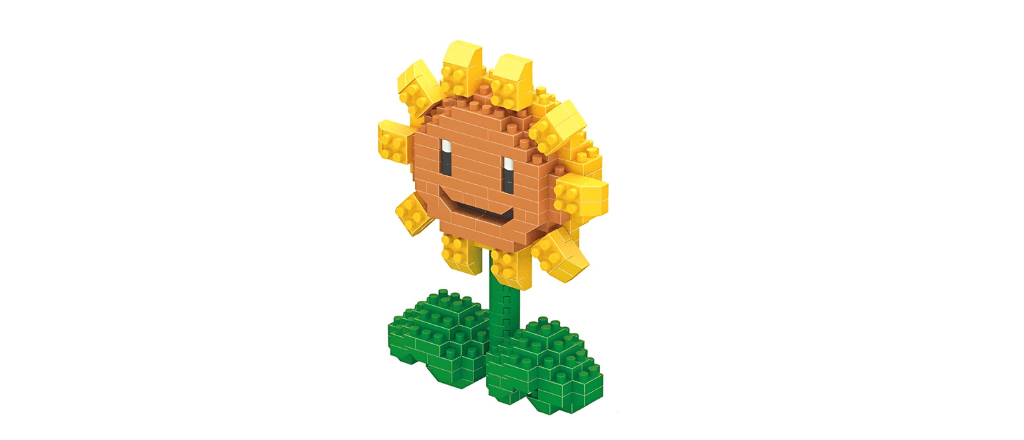
While Chompers and Crazy Dave are your stars, supporting elements enhance the story and setting. Additional plants from the Plants vs. Zombies roster add context and suggest the broader strategy of lawn defense. A Sunflower or two positioned nearby suggests the resource generation that makes planting Chompers possible. A Wall-nut in front provides defensive context. These supporting plant builds don’t need to be as elaborate as your hero Chomper, but their presence enriches the scene.
Zombie minifigures approaching from the far side of the lawn create tension and purpose. Even simple zombie figures—standard LEGO minifigures with tattered printing or gray/green coloring—effectively suggest the threat being defended against. Position them at various distances to show the wave approaching, with perhaps one zombie dangerously close to the Chomper, about to become lunch. This creates a frozen moment of gameplay that fans of the game will immediately recognize and appreciate.
Small details bring the scene to life and reward close inspection. Fallen leaves using brown or orange pieces scattered on the lawn suggest autumn (a common setting in PvZ). Transparent yellow pieces near a Sunflower represent sun being generated. A tiny lawnmower built from a few gray and red pieces references the game’s last-ditch defense. These easter eggs and references delight viewers who know the game and add layers of meaning to your creation.
Advanced Techniques and Customization
Once you’ve mastered the basics of building Chompers, Crazy Dave, and diorama construction, numerous advanced techniques and customizations can take your creation to the next level. These approaches require more experience, specialized pieces, or additional time investment, but they result in displays that truly stand out and showcase your building skills.
Lighting integration transforms static displays into dynamic presentations. Small LED lights can be incorporated to illuminate specific elements—perhaps a warm yellow light for sun-producing plants, an eerie green glow for the Chomper’s mouth interior, or ambient lighting that makes the entire scene pop in a display case. LEGO’s official light kits provide easy integration, while third-party options from companies like Light My Bricks offer more customization and effect options.
Motorization and Animation
Truly ambitious builders might incorporate motorized elements that bring movement to the diorama. LEGO’s Power Functions or Powered Up systems can drive motors that create animated effects. Imagine a Chomper whose jaws slowly open and close continuously, Crazy Dave’s arms that wave periodically, or zombies that slowly shamble forward on a hidden track. These animated elements require significant planning and technical skill but create unforgettable displays that attract attention at conventions and exhibitions.
The challenge with motorization is concealing the mechanisms while maintaining the aesthetic of the scene. Motors, battery boxes, and gearing must be hidden beneath the base or behind elements where they don’t interfere with the visual presentation. This often requires building the diorama with two levels—the visible surface where the scene plays out, and a hidden technical level below where all the mechanical elements live. Proper planning and clever engineering make this possible without significantly increasing the display footprint.
Custom Printing and Decals
While LEGO offers an incredible variety of pieces, sometimes the perfect element for your vision doesn’t exist in the official catalog. Custom printing services can create exactly the pieces you need with professional-quality results. Custom-printed tiles can show Crazy Dave’s face with game-accurate details, or create signage elements that reference Plants vs. Zombies. Custom torsos and heads bring characters to life with precision that generic pieces can’t match.
Waterslide decals offer a DIY approach to customization that’s more affordable than professional printing services. You can design decals on your computer, print them on waterslide decal paper using a standard inkjet or laser printer, and apply them to LEGO pieces. This technique works particularly well for creating details like faces, text elements, or complex patterns that would be difficult to achieve with standard building techniques. The learning curve is moderate, but the results can be impressive and highly personalized.
Displaying and Photographing Your Creation
After investing hours or even days building your Plants vs. Zombies diorama, proper display and documentation ensures your creation receives the appreciation it deserves. Thoughtful presentation protects your build, showcases it effectively, and allows you to share it with the broader community.
Display case selection balances protection with visibility. Acrylic display cases keep dust off your creation and protect it from accidental damage while allowing clear viewing from all angles. The case should be slightly larger than your diorama to avoid a cramped appearance and allow air circulation that prevents moisture buildup. Some builders use museum-quality cases with UV protection to prevent color fading if the display will be in direct sunlight, though keeping LEGO away from intense UV exposure is always advisable.
Photography Tips for LEGO Dioramas
Great photography transforms your physical creation into sharable digital content that can reach audiences worldwide. Proper lighting is the foundation of good LEGO photography. Natural diffused light from a north-facing window (in the Northern Hemisphere) provides soft, even illumination without harsh shadows. Alternatively, artificial lighting using softboxes or diffused LED panels creates consistent results regardless of time of day or weather.
Background selection significantly impacts photo quality. A clean, neutral background keeps attention on your build rather than distracting elements. Many photographers use seamless paper backdrops in white, gray, or colors that complement the scene. For Plants vs. Zombies dioramas, a light blue background might suggest sky, while neutral gray provides a professional catalog-style presentation. Some photographers prefer environmental backgrounds that add context, though these must be chosen carefully to enhance rather than overwhelm the subject.
Camera settings and composition techniques elevate amateur snapshots to compelling images. Use a low ISO (100-400) for clean images without noise, a moderate aperture (f/8-f/11) for good depth of field that keeps most of the scene in focus, and adjust shutter speed as needed for proper exposure. Shoot from multiple angles to show different perspectives of your creation. Close-up detail shots highlight intricate building techniques, while wide shots show the overall composition and context.
Sharing Your Build with the Community
The LEGO and Plants vs. Zombies communities are incredibly welcoming and enthusiastic about fan creations. Sharing your diorama connects you with like-minded builders, generates valuable feedback, and contributes to the broader conversation about Plants vs. Zombies LEGO possibilities.
Online platforms offer various ways to share your creation. Reddit communities like r/lego, r/legophotos, and r/PlantsVSZombies welcome fan builds with enthusiastic engagement. Instagram hashtags like #legomoc, #plantsvszombies, and #legophotography help your posts reach interested audiences. Flickr groups dedicated to LEGO building provide communities of serious builders who offer constructive feedback and appreciation for technical skills.
When sharing your work, context enhances appreciation. Explain your design decisions, building challenges, and techniques used. Discussing how you engineered the Chomper’s jaw mechanism or why you chose specific colors helps viewers understand your creation on a deeper level and provides valuable information for builders planning their own projects. This kind of detailed sharing builds your reputation as a knowledgeable builder and contributes meaningfully to the community.
Participating in LEGO conventions and exhibitions takes sharing to the physical realm. Events like BrickCon, Brickworld, or smaller regional LEGO shows welcome MOC displays and attract audiences who truly appreciate building craftsmanship. Seeing people’s reactions to your creation in person, answering questions about your techniques, and connecting with fellow builders creates memorable experiences that online sharing can’t replicate. These events often feature competitions and awards that provide recognition for exceptional builds.

Expanding Your Plants vs. Zombies LEGO Universe
Completing your Chompers and Crazy Dave diorama is just the beginning of your Plants vs. Zombies LEGO journey. The game’s rich roster of plants, zombies, and settings offers endless possibilities for future builds that can expand your display or inspire entirely new projects. This is where your passion for both franchises can truly flourish as you develop an entire LEGO garden defense system that showcases the full scope of the PvZ universe.
Whether you choose to expand your current diorama or start fresh with new concepts, each additional build deepens your understanding of LEGO techniques while celebrating different aspects of the game. Some builders prefer to create a comprehensive collection methodically, while others jump between projects based on inspiration and available pieces. There’s no wrong approach—the key is maintaining enthusiasm and challenging yourself with each new creation.
Building the Complete Plant Arsenal
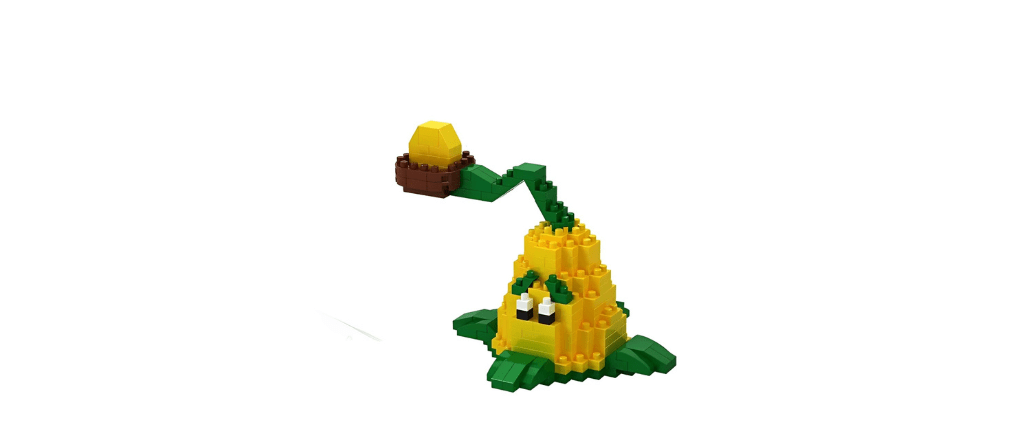
Other plants from the game present unique building challenges and opportunities. The Peashooter’s launching mechanism, Sunflower’s cheerful personality, Wall-nut’s defensive stance, and countless other plants each bring distinct characteristics that translate into interesting LEGO builds. Creating a full collection of buildable plants becomes a long-term project that showcases your evolving skills and provides a comprehensive Plants vs. Zombies LEGO experience.
Each plant family offers different technical challenges that help you develop specific building skills. Shooting plants like Peashooter, Snow Pea, and Repeater require working with projectile mechanisms and launching systems. Explosive plants such as Cherry Bomb and Jalapeno need creative solutions for representing fire and blast effects. Defensive plants like Wall-nut, Tall-nut, and Pumpkin challenge you to create sturdy-looking structures that convey protection and resilience. Mushroom plants for nighttime levels introduce different color palettes and glowing effects.
The variety in plant types means you’ll never run out of new techniques to master. Aquatic plants for pool levels require transparent blue elements and water effects. Elevated plants like Cabbage-pult and Kernel-pult need mechanisms suggesting launching trajectories. Instant-use plants can be built with special bases or effects that show their one-time explosive nature. Each new plant build adds to your arsenal while teaching you something new about LEGO construction.
Creating the Zombie Horde
The zombie side deserves equal attention. Building recognizable zombie minifigures for all the game’s zombie types—from basic zombies to specialized variants like Football Zombie, Buckethead Zombie, and the imposing Gargantuar—creates opponents for your plants and completes the battlefield narrative. These builds range from simple minifigure customization to complex brick-built figures depending on your preferences and ambitions.
Standard zombies provide excellent practice for minifigure customization techniques. Experimenting with different head prints, torso designs, and accessory combinations helps you develop an eye for character representation at minifigure scale. Tattered clothing, distinctive accessories, and characteristic poses bring each zombie type to life. The Conehead and Buckethead zombies are particularly satisfying to create because their defining features—traffic cones and metal buckets—translate so naturally to LEGO elements.
Special zombies offer opportunities for more advanced building. The Gargantuar demands either a large brick-built figure or creative use of LEGO’s bigfig elements with extensive customization. The Dolphin Rider Zombie requires building both the zombie and its aquatic companion. The Zomboni needs vehicle construction skills. Dr. Zomboss himself deserves an elaborate build featuring his various contraptions and mad scientist accessories. Each special zombie becomes a mini-project that expands your diorama’s scope and storytelling possibilities.

From Bricks to Battle: Making Your Garden Defense Come Alive
Building a Plants vs. Zombies diorama featuring Chompers and Crazy Dave brings together everything that makes both LEGO and PvZ special—creativity, strategy, humor, and endless possibilities. Whether you’re creating a simple vignette with a single Chomper and Crazy Dave minifigure or an elaborate multi-level display with animated elements and dozens of plants, the journey of building is as rewarding as the final display. This project represents more than just assembling bricks; it’s about bringing a beloved game to life in tangible, three-dimensional form.
The skills you develop through this project extend far beyond this specific diorama. The techniques for creating organic plant shapes, engineering working mechanisms, customizing minifigures, and composing compelling scenes all transfer to future LEGO projects of any theme. You’re not just building a Plants vs. Zombies display—you’re becoming a better, more versatile LEGO builder with each brick you place.
Your Unique Creative Vision
The techniques and approaches discussed here provide a foundation, but your creativity determines the ultimate result. Don’t be afraid to experiment with different building techniques, try unusual color combinations, or incorporate elements that reflect your personal interpretation of the Plants vs. Zombies universe. The beauty of LEGO is that there’s no single correct way to build anything—every builder brings their own perspective and style to their creations.
Some builders prefer game-accurate representations that faithfully recreate the exact appearance of plants and zombies from the digital version. Others take creative liberties, reimagining characters in more realistic styles or exaggerating features for comedic or dramatic effect. Your diorama might be bright and colorful, capturing the cheerful cartoon aesthetic, or you might create a darker, more apocalyptic interpretation that emphasizes the zombie invasion aspect. Both approaches are valid and interesting in different ways.
Consider incorporating personal touches that make the diorama uniquely yours. Maybe you include your favorite plant that doesn’t get enough recognition in the community. Perhaps you add a custom zombie type inspired by inside jokes with friends. You might build Crazy Dave’s house in a style that matches your own neighborhood architecture. These personalized elements transform your build from a recreation into an original creation that carries your signature.
Ready Your Defenses—The Zombies Are Coming!
As you place that final brick and step back to admire your completed diorama, you’ll have created something unique that celebrates two beloved properties while showcasing your building skills. Your Chomper stands ready to defend against the zombie horde, Crazy Dave enthusiastically explains the strategy, and your lawn has never looked better. The zombies are coming, but with LEGO bricks, a bit of creativity, and a lot of passion, your garden defense is ready for anything.
Display your creation proudly, share it with the community, and let it inspire others to attempt their own Plants vs. Zombies LEGO projects. Each builder who takes on this challenge adds to the collective dream of seeing official LEGO Plants vs. Zombies sets someday. Your diorama demonstrates the potential of this collaboration and proves that these two universes belong together in brick form.
Now get building—those zombies won’t stop themselves, and Crazy Dave is counting on you! Whether you’re placing your first green brick for the lawn or putting the finishing touches on an elaborate multi-level defense system, you’re part of a passionate community that believes in the power of creativity, play, and defending your garden one brick at a time. The sun is shining, the plants are ready, and your LEGO adventure in Neighborville has just begun. Happy building, and may your Chompers always be hungry!